Loading page, please wait...
WhatsApp 24/7:+1 (302) 899-2888

Planning your trip to Japan? Between booking your JR Pass, figuring out how to pack for unpredictable weather, and daydreaming about sushi and sakura, one thing you definitely do not want to leave until the last minute is your mobile data.
In 2026, using an eSIM in Japan has become the go-to solution for travelers who want fast, reliable internet without the hassle of swapping physical SIM cards. Whether you are landing in Tokyo for business, hiking through the mountains of Nagano, or temple-hopping in Kyoto, having an eSIM ready means you can get online quickly and travel with confidence.
That said, activating an eSIM in Japan is not always as plug-and-play as it sounds, especially if it is your first time using one. Should you activate it before you fly or after you arrive? What happens if the QR code does not scan? Does the setup process work differently on iPhone versus Android?
Most Japan travel eSIMs are data-only, and you can install them before departure or after landing. Activation usually begins when the eSIM connects to a supported mobile network in Japan, not when you scan the QR code. You can also keep your home SIM active for calls and SMS unless you choose to turn it off manually.
This guide will walk you through how to activate your Japan eSIM step by step, explain the differences between iPhone and Android setup, and help you troubleshoot common issues so you can stay connected from the moment you touch down.
Let’s get into it — because Japan’s ramen bowls and robot cafés should not have to wait for slow-loading Google Maps.
Japan might be famous for vending machines that sell umbrellas and toilets that talk to you, but when it comes to mobile connectivity, things can still feel surprisingly old school, especially for travelers.
You’ve probably heard that Japan has great internet speed. And yes, that’s true. But public Wi Fi is still quite limited, and if you rely on hotel networks or jump between café hotspots, you will quickly run into frustrating dead zones. On top of that, public networks are not always secure.
This is where eSIM makes a real difference.
Landing in Japan used to mean searching for a SIM counter at the airport, swapping tiny SIM cards, and hoping you did not lose your original SIM somewhere between immigration and baggage claim.
With an eSIM, everything is digital. There is no physical card to insert or remove. You simply scan a QR code or follow a few setup steps on your phone, and you are connected. Many travelers even activate their eSIM before departure, so their phone connects automatically as soon as the plane lands.
Japan has some of the most advanced mobile networks in the world. A high quality Japan eSIM connects you directly to local carriers, which means stable signal and fast data speeds in both big cities and rural areas.
This makes everyday travel much smoother. Navigation apps load instantly when you are rushing through Tokyo stations. Video calls stay clear if you are working remotely. Uploading photos or videos happens without long waiting times.
Compared to international roaming plans, which often throttle speed or switch between networks, a Japan focused eSIM gives you a more consistent experience.
Whether you are visiting Japan for a few days or staying for several weeks, eSIM plans are designed to be flexible. You can choose a plan based on how long you stay and how much data you actually need.
In 2026, many travelers move between multiple countries on the same trip. eSIMs for international travel make this easier by allowing you to add or switch plans without changing SIM cards or signing long-term contracts.
One of the biggest advantages of using an eSIM in Japan is cost control. You are using a local data plan, not international roaming from your home carrier.
This means no unexpected charges and no stressful bill waiting for you when you return home. You pay for your data upfront and that is it.
Before purchasing or activating a Japan eSIM, it is important to confirm that your device supports eSIM technology. Most modern smartphones do, but support can vary by model, region, and carrier. You can check compatibility with this updated list of eSIM-compatible devices.
Most iPhones released from iPhone XS / XR and newer support eSIM. To quickly check on your device:
Go to Settings → General → About
Scroll down and look for an EID number
If you see an EID, your iPhone supports eSIM.
Many newer Android devices support eSIM, including select models from Samsung, Google Pixel, Xiaomi, and Motorola. To check:
Go to Settings → About Phone
Look for EID or eSIM status
Or:
Go to Settings → Network & Internet → SIMs
Check if Add eSIM is available
Because Android eSIM support varies by manufacturer and region, always confirm before purchase.
If you are unsure whether your device supports eSIM, you can also verify compatibility using your phone’s IMEI number through the eSIM provider’s compatibility checker. This method is especially useful for Android devices, where eSIM support can vary by model and region.
Simply enter your IMEI on the provider’s website to confirm whether your phone is supported before purchasing an eSIM.
Once you’ve confirmed that your phone supports eSIM, the next big question is timing: Should you activate your eSIM before you leave for Japan, or wait until you land?
The answer depends on your eSIM provider, your comfort level with tech, and how you like to travel. Let’s break down the pros and cons of each option so you can choose what works best for you.
Activating your eSIM before your flight is a great choice if your provider allows pre-activation without starting the data countdown immediately. Some eSIMs begin counting the validity period as soon as they are installed, while others only start once you connect to a local network in Japan.
Here’s when pre-activation makes sense:
You want peace of mind knowing everything is working before you travel
You’ll be arriving late at night or at an unfamiliar airport
You want internet access immediately upon landing (for directions, ride apps, etc)
You’re not sure if you’ll have access to Wi Fi at the airport
If this sounds like you, here’s what to do:
Install the eSIM on your device at home
Follow the setup instructions but don’t turn on roaming yet
Once you land in Japan, enable Data Roaming to connect
Pro tip: Some providers, like GOHUB, allow you to install and even test the connection without triggering the data countdown. That means you can relax and just toggle it on when you're ready.
Waiting until you land in Japan to activate your eSIM is totally fine too. This approach works well if:
Your provider starts counting usage immediately upon installation
You prefer to activate using local Wi Fi (like at the airport or hotel)
You’re confident doing the setup yourself on the go
You want to avoid any early data usage or activation issues before arrival
If you choose this option, just make sure you have:
A printed or saved version of your eSIM QR code
Access to Wi Fi upon landing
Enough phone battery to complete setup
Some airports in Japan have free Wi-Fi in arrival areas, but not all. Be sure to download your setup instructions beforehand just in case.
Still unsure which option is better for you? Here’s a balanced approach:
Install your eSIM before you leave
Don’t enable roaming or set it as your active SIM yet
Once you land, finish activation with one tap
This way, you get the best of both worlds — a smooth setup and full control over when your data starts counting. In the next section, we will walk through how to activate eSIM in Japan on both iPhone and Android.
Activating a Japan eSIM is usually quick and straightforward, but the exact steps can vary slightly depending on whether you are using an iPhone or an Android device. The most common method is scanning a QR code provided after purchase.
Supported: iPhone XR/XS and newer
Go to Settings → Cellular (or Mobile Data)
Look for Add eSIM or Set Up Mobile Service
Tap Use QR Code — your camera will open
Scan the QR code provided via email or customer portal
→ Can’t scan? Use manual setup (see later section)
Label the plan (e.g. “Japan eSIM”)
Choose Data Only if your plan doesn’t include calls
Settings → Cellular → your eSIM → turn on Data Roaming
You’re now ready to connect once you land in Japan.
Step-by-step guide to activate an eSIM on iPhone device. Visual by: Gohub eSIM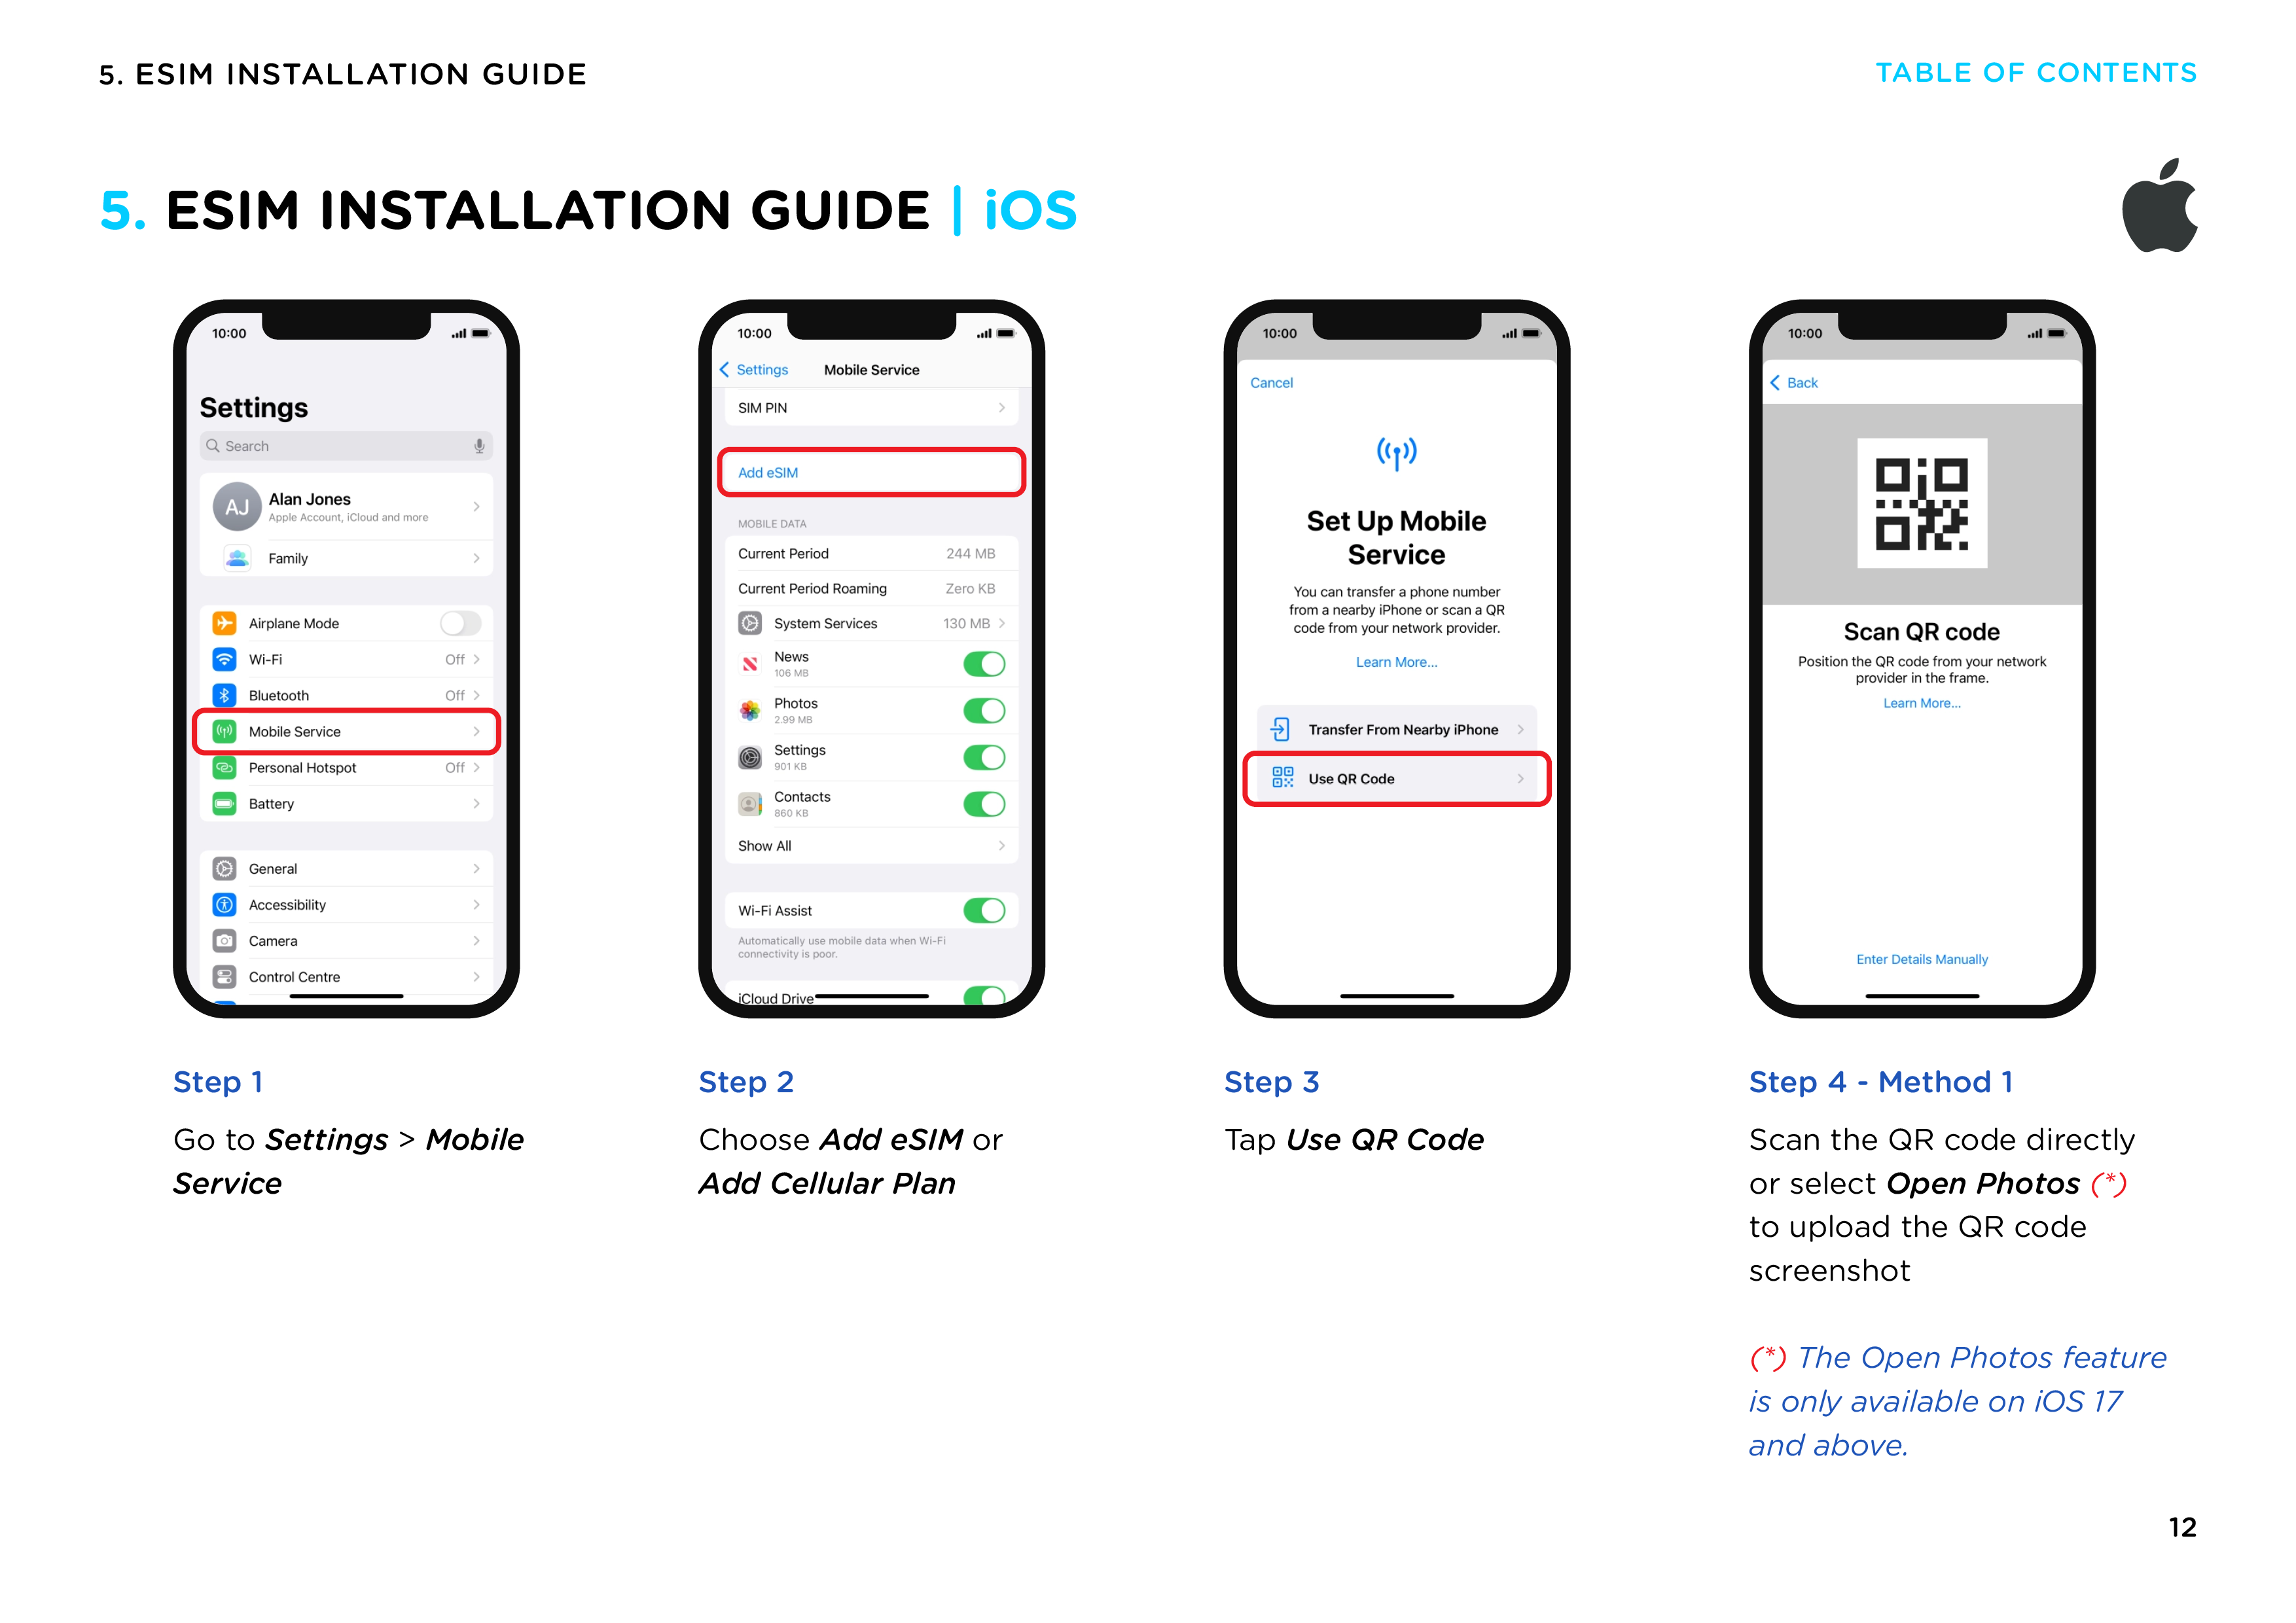
Works on most modern Samsung, Pixel, Oppo, Xiaomi, and more.
Go to Settings → Network & Internet (or Connections)
Look for SIM cards, Mobile networks, or eSIM
Tap Add eSIM, Download SIM, or Add Mobile Plan
Use your phone’s camera to scan the QR code from your email or screen
→ Can’t scan? Use manual entry with SM-DP+ code
You may be asked to name it or select it for data
Enable Mobile Data and Data Roaming under your new eSIM
Done! Your phone will connect to a local Japanese carrier when available.
Step-by-step guide to activate an eSIM on Android device. Visual by: Gohub eSIM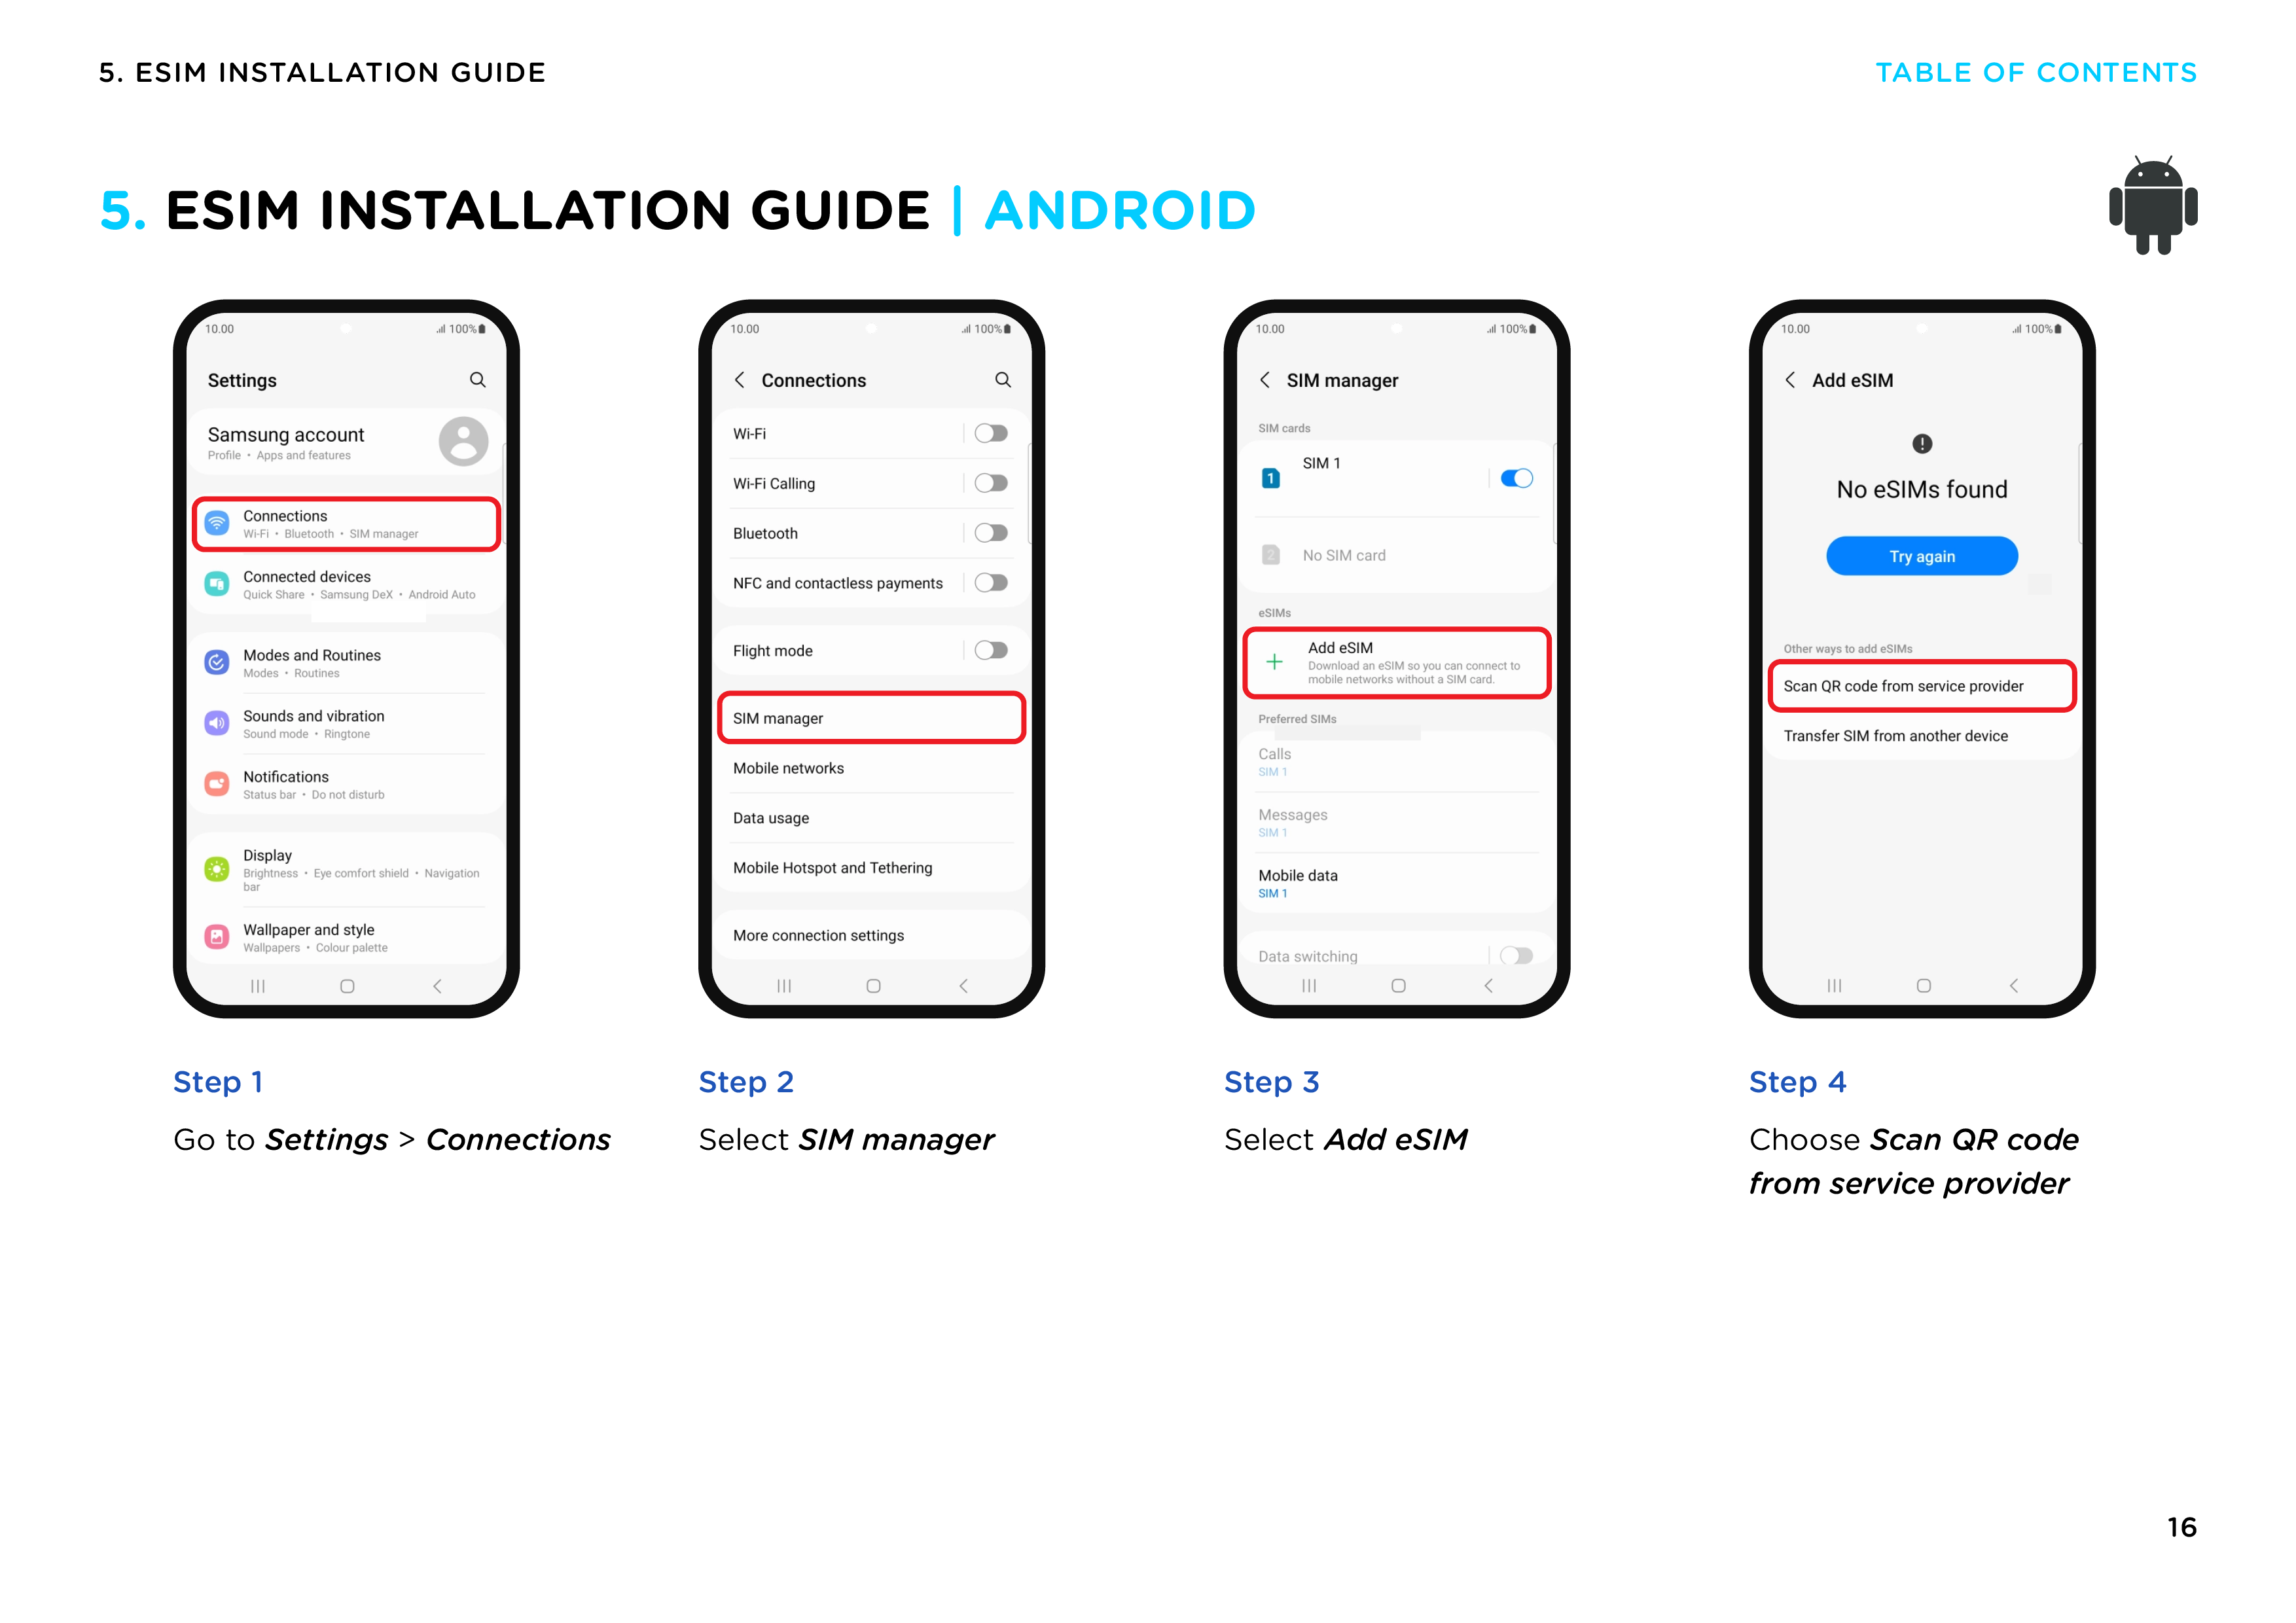
You can install the eSIM manually by selecting Enter Details Manually and entering the SM-DP+ address and activation code provided in your order confirmation.
📌 Pro Tip: After setup, test with Google Maps or a quick browser search to make sure everything’s working before you leave the airport.
Ready to choose your plan but still comparing options?
Read our Best Travel eSIM for Japan guide first, then pick the plan that fits your trip:
👉 Best Travel eSIM for Japan (2026 Guide)
Sometimes, your phone just doesn’t want to play nice with QR codes. Maybe the image isn’t sharp, your screen brightness is too low, or your camera’s just being stubborn. Whatever the reason, don’t worry — there’s a backup plan.
Most eSIM providers also give you the option to install your eSIM manually using something called an SM-DP+ address and an activation code. It might sound a bit technical, but the process is actually quite simple.
You’ll need three things from your eSIM provider:
SM-DP+ Address
Activation Code
(Optional) Confirmation Code – not always required
These details are usually included in your confirmation email or found in your account dashboard.
Go to Settings
Tap Cellular or Mobile Data
Tap Add eSIM
Instead of choosing “Use QR Code,” tap Enter Details Manually
Enter the SM-DP+ address and activation code as provided
Follow the prompts to finish setup
Turn on Data Roaming when you're ready to connect
Open Settings
Tap Network & Internet or Connections
Go to SIM Cards or Mobile Network
Tap Add eSIM or Download SIM
Look for an option like Enter Code Manually
Input the SM-DP+ address and activation code
Confirm and install the eSIM
Enable Mobile Data and Data Roaming
Manual setup is helpful if:
The QR code won't scan
You printed the QR code but it's blurry or damaged
You're helping someone else set up their eSIM remotely
You want to install using just text (no images)
It’s also good to have this info saved somewhere offline in case you don’t have Wi Fi when it’s time to set up.
After installing your Japan eSIM, make sure Data Roaming is turned on for the eSIM line. Most travel eSIMs require data roaming to be enabled in order to connect to local networks in Japan.
In most cases, your phone will automatically select the best available network once you arrive. If you experience slow speeds or no signal, you can try switching to manual network selection and reconnecting to a supported local carrier.
In Japan, travel eSIMs commonly connect through major local networks such as KDDI, depending on coverage and location. Network performance may vary between large cities, rural areas, and when traveling on high-speed trains.
Don’t skip this one. Without data roaming turned on, your phone won’t connect to local networks in Japan, even if the eSIM is installed correctly.
Go to Settings
Tap Cellular or Mobile Data
Select your new eSIM plan (e.g. “Travel” or “Japan”)
Tap Data Roaming and turn it on
Open Settings
Go to Network & Internet
Select your eSIM or mobile plan
Turn on Data Roaming
Roaming in this context doesn’t mean extra charges — since you’re using a Japan-based eSIM, there are no roaming fees involved. It just tells your phone to allow data on foreign networks.
This makes sure your phone uses the Japan eSIM for internet access instead of your physical SIM or any other plan.
Go to Settings
Tap Cellular
Scroll to Cellular Data and select your eSIM plan
(Optional) Turn off Allow Cellular Data Switching to prevent your phone from switching back automatically
Go to Settings
Tap Network & Internet → SIMs
Choose your eSIM as the preferred SIM for mobile data
Some phones require a quick restart for all settings to kick in. If your eSIM doesn't connect immediately, try powering off and turning your device back on.
Once roaming is on and your data SIM is set:
Open a browser
Check Google Maps
Try sending a message or loading an app
If everything loads smoothly, congratulations you’re connected in Japan!
So, you’ve followed all the steps, double-checked your settings, and still… no connection? Don’t panic. eSIM hiccups happen, especially when you're dealing with different phone models, software versions, or foreign networks.
Here are the most common problems travelers face when activating an eSIM in Japan — and how to fix them fast.
What it looks like:
Your eSIM is installed and data roaming is turned on, but you see “No Service” or “Searching” in the top corner of your screen.
Possible fixes:
Restart your phone. Sounds basic, but it often works.
Toggle Airplane Mode on and off. This forces your phone to search for available networks again.
Manually select a carrier:
On iPhone: Settings → Cellular → Network Selection → Turn off Auto and choose a Japanese carrier like NTT DOCOMO, KDDI, or SoftBank
On Android: Settings → Network & Internet → Mobile Network → Choose Network Manually
Move to an open area. Airports and underground train stations can have poor reception. Try stepping outside.
What it looks like:
Your phone says the eSIM is inactive or doesn’t show up under mobile plans.
Possible fixes:
Reinstall the eSIM using the original QR code or activation info
Make sure your phone is unlocked. Locked phones won’t allow international eSIMs
Check for a software update — sometimes bugs are fixed in the latest iOS or Android patch
If all else fails, delete the eSIM profile and install it again manually
What it looks like:
Your camera won’t recognize the code, or it throws an error during scanning.
Possible fixes:
Increase screen brightness if you’re scanning from another device
Clean your camera lens
Try scanning from a printed version instead of a screen
If the QR still won’t work, fall back to manual installation using the SM-DP+ address and activation code (covered earlier)
What it looks like:
You have bars of signal but no internet connection — apps won’t load and speed test shows nothing.
Possible fixes:
Double-check that data roaming is turned on
Make sure your eSIM is selected as the default data SIM
Reset network settings:
On iPhone: Settings → General → Transfer or Reset iPhone → Reset → Reset Network Settings
On Android: Settings → System → Reset → Reset Wi-Fi, mobile & Bluetooth
Try switching between 4G and 5G in your network settings
Contact your eSIM provider's support for real-time diagnostics
The best eSIM providers (like GOHUB ) have 24/7 customer support ready to walk you through setup, reset your QR code, or troubleshoot connection issues. Don’t hesitate to reach out — especially if you’re jet lagged and your brain’s running on matcha and adrenaline.
Even though eSIMs are designed to be convenient, a little preparation goes a long way — especially when you’re flying to a country where everything from the language to the train ticket machines can feel totally unfamiliar.

Here are a few simple tips to make sure your eSIM experience in Japan goes smoothly from the moment you touch down.
Before your flight:
Save your QR code or manual activation info to your phone (and maybe a screenshot or printout just in case)
Download installation instructions from your provider
Take a screenshot of your provider’s support contact in case you need help without Wi Fi
If your eSIM provider allows it, install the eSIM before you fly. This gives you a head start and helps you avoid tech stress in a foreign airport.
Just remember not to turn on roaming or switch to that SIM until you land — or else your data plan might start counting down before you're even on the plane.
You’ll likely need your phone immediately for maps, train schedules, or confirming your hotel address.
Make sure:
Your phone is fully charged before boarding
You carry a portable charger (especially if your flight is long)
Your battery saver mode is off when installing the eSIM
Japan’s major airports (Narita, Haneda, Kansai, etc.) usually offer free Wi Fi in arrival areas. If you didn’t install your eSIM beforehand, you can use this connection to complete the setup.
That said, Wi Fi networks in Japan often require email registration or clicking through a Japanese-only portal page — so be patient.
Once your eSIM is installed and roaming is on, double check that your phone won’t switch back to your physical SIM.
On iPhone: Go to Settings → Cellular → turn off "Allow Cellular Data Switching"
On Android: Set your eSIM as the default for data, and disable auto switch if available
If you need to manually select a network in Japan, look for these major carriers:
NTT DOCOMO
KDDI (au)
SoftBank
Once you're online, try loading Google Maps or running a quick speed test. This helps confirm your eSIM is working properly and gives you peace of mind before you head out into the city.
Yes, if your provider supports it. Just avoid turning on roaming until you land.
Yes, a stable internet connection is required during setup.
You can install manually using the SM-DP+ address and activation code.
Most travel eSIMs in Japan are data-only and do not include a local phone number.
Yes, just set the eSIM as your data SIM and disable roaming on the other line.
Most travel eSIMs are single-use or tied to a specific validity period. In most cases, you will need to purchase a new eSIM for a future trip.
For many travelers, yes. An eSIM is more convenient and does not require carrying or charging an extra device.
Check your device settings for an option to add a mobile plan or eSIM. On iPhone, you can also look for an EID under Settings → General → About.
Some providers allow you to top up your eSIM directly through their website or app. Others may require you to install a new eSIM plan.
Staying connected while exploring Japan doesn’t have to be complicated. With an eSIM, you can skip the lines, avoid the roaming fees, and dive straight into the experience — whether you’re hopping on a Shinkansen, getting lost in an alley full of ramen shops, or video calling home from the top of Mt. Fuji.
Just a few taps, and you're online.
If you’re looking for a trusted Japan eSIM that’s easy to set up, fast, and backed by real human support, check out what we’ve got at GOHUB. Our eSIMs are built for travelers — no hidden fees, no confusing tech talk, just solid data and peace of mind.
👉 Ready to travel smarter?
Start with GOHUB’s Japan eSIM plans and get connected in minutes.
Safe travels, and happy exploring
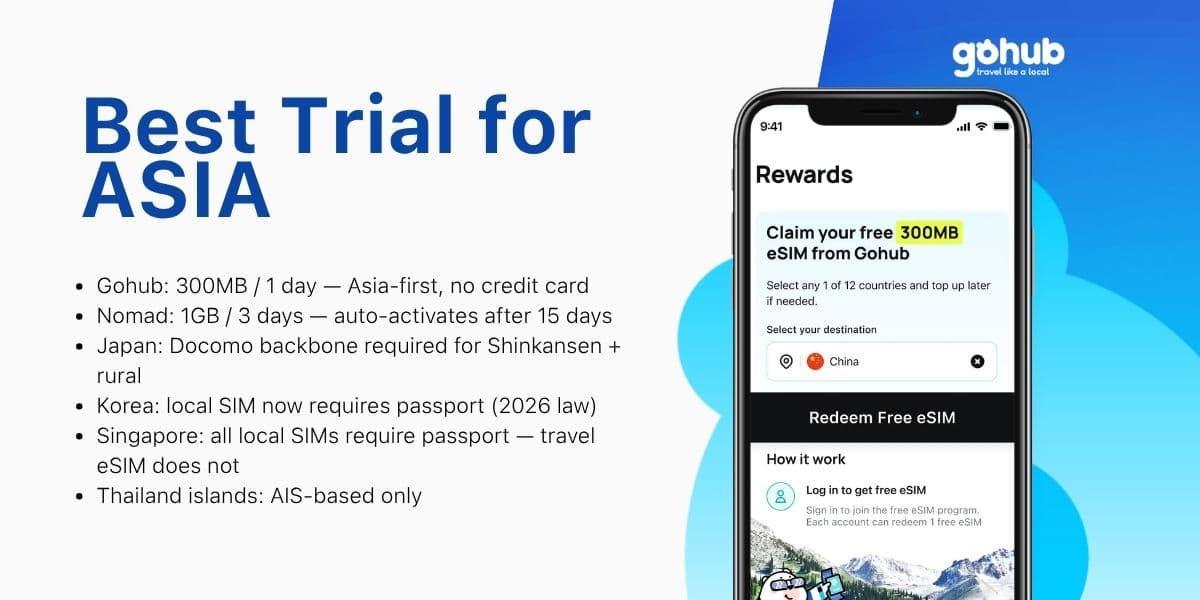
Traveling to Japan, Korea, Thailand, or Singapore? Compare free eSIM trials by destination, trip length, and KYC requirements — find the right option for your Asia itinerary.
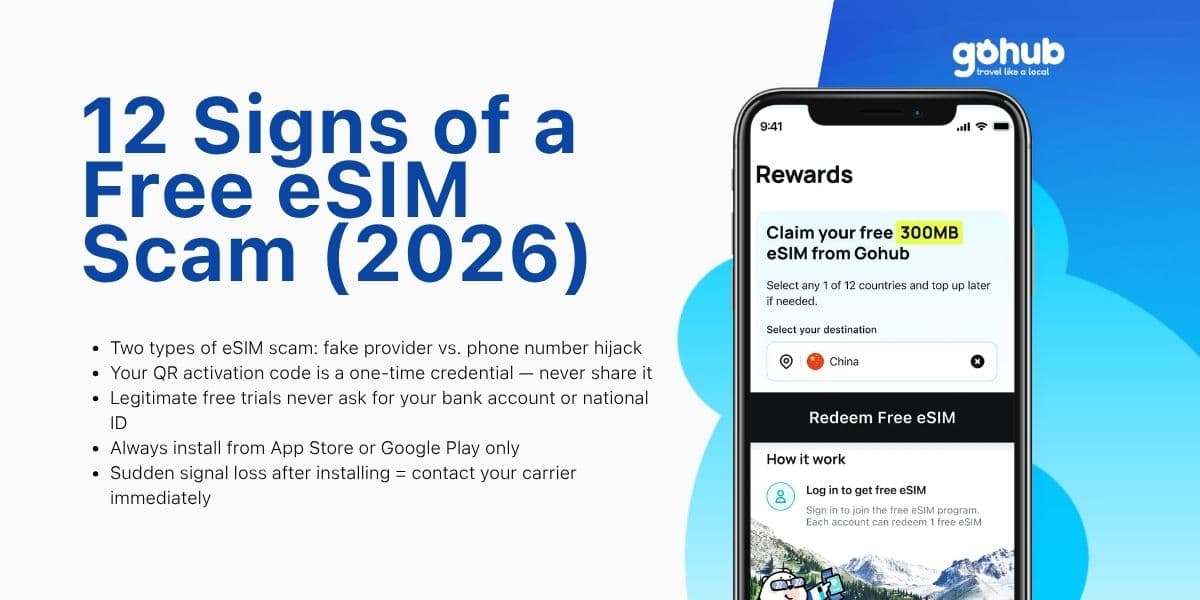
Fake QR codes, "free unlimited" traps, SIM swap attacks — learn the 12 warning signs of a free eSIM scam and how to verify any provider before you install. Updated March 2026.

Get a Gohub free eSIM trial with 300MB for 1 day across Asia. Learn how to activate, use data efficiently, and avoid common setup issues.