As international travelers, backpackers, and digital nomads, we love technology that makes our lives easier on the road. eSIMs are a perfect example – they’re digital SIMs built into your iPhone, eliminating the need for physical cards and letting you manage multiple plans effortlessly. You can activate new plans digitally, which is incredibly convenient, especially when hopping between countries.
However, sometimes technology throws a curveball — especially when your travel eSIM is not working as expected. A typical eSIM error on iPhones that can stop you in your tracks is the dreaded message: “eSIM Cannot Be Added. This code is no longer valid.
Don’t worry; you’re not alone, and it’s often fixable. This guide will dig into why this error pops up and provide practical, step-by-step solutions drawing on reliable information to get you back online.
💡 At GOHUB, we’ve helped thousands of travelers stay connected with reliable, affordable eSIMs across 100+ countries – and yes, we’ve seen this error pop up more times than we can count. That’s why we’ve built this guide just for you.
Common eSIM Installation Issues on iPhone (And Why That “Code is No Longer Valid” Error Appears)
Encountering the “code is no longer valid” message during eSIM installation indicates a problem adding the eSIM profile to your iPhone. There are several common reasons for this, according to the sources:
- The QR code or activation code has already been used. This is a very frequent cause. Most eSIM QR codes are designed for single use. If the code was scanned before, even if you later removed the eSIM profile, it generally cannot be used again.
🍏 New to eSIM? Start with the iPhone eSIM install guide to make sure your setup is correct.
- The QR code has expired. Providers often set an expiration date for their QR codes, sometimes around 6 months. After this date, the provider may deactivate them, rendering the code invalid.
- Network connectivity issues during installation. A stable internet connection is crucial for the eSIM setup process to verify and activate the plan. A weak or interrupted connection can cause the installation to fail.
- There might be a problem with scanning the QR code itself. Ensure the image is clear and undamaged.
- The device may have reached its maximum number of supported eSIM profiles. iPhones can handle multiple eSIMs, but there’s a limit. If you hit this limit, you can’t add another without removing an existing one.
- An active VPN may sometimes disrupt the installation process. It can cause confusion during the setup.
- Crucially: The eSIM might already be installed. This error message frequently appears even if the installation process seemed to fail initially, because the eSIM profile actually did install in the background. You just didn’t see a success message.
Understanding these potential causes is key to fixing the issue.
Using both eSIM and SIM? Here’s how to manage dual SIM setup properly.
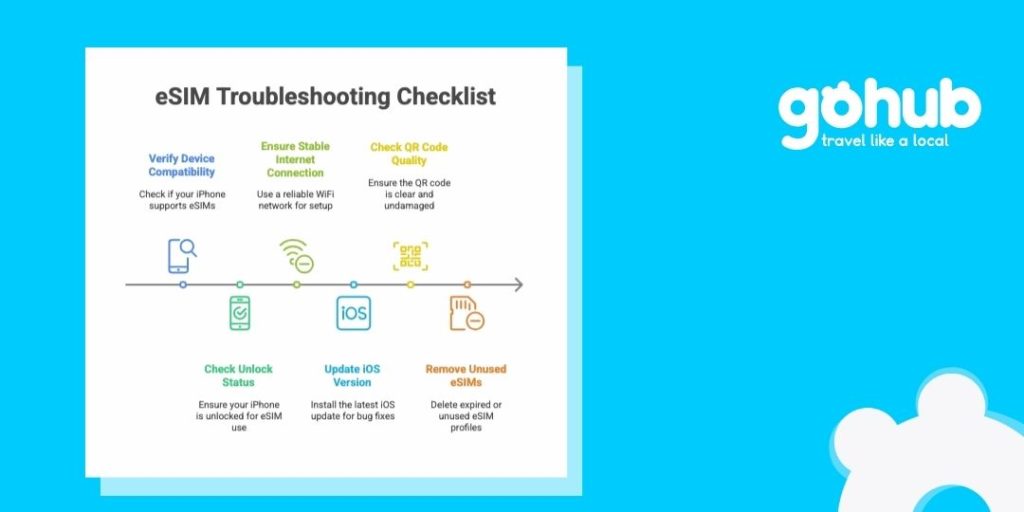
Before You Troubleshoot: Essential Checks & Best Practices
Before you dive into fixing the error, take a few moments to perform some essential checks. These can often prevent the issue or make troubleshooting smoother:
- Verify device compatibility and unlock status. Ensure your iPhone model supports eSIMs (iPhone XS models or later generally do). Crucially, an unlocked iPhone is necessary to use eSIMs from any carrier other than the one it’s locked to. You can check for “Carrier Lock” or “Network Provider Lock” in Settings > General > About. If it says “SIM Locked,” contact your original carrier to request an unlock. If it says “No SIM restrictions,” you’re unlocked.
✅ Pro tip from GOHUB: All of our eSIMs come with a detailed compatibility guide and instant activation instructions, so you can avoid this step altogether if you’re using our plans.
- Ensure a stable and strong Internet connection. This is absolutely essential for successful eSIM setup. It’s recommended to use a reliable WiFi network. While iPhone 14 models and later can activate without Wi-Fi, a good connection is still important during setup.
- Confirm your iPhone has the latest iOS version installed. Updates often include bug fixes that could resolve eSIM issues. You can check in Settings > General > Software Update.
- If you’re using a QR code, ensure it’s a good quality, undamaged image for scanning.
- Consider removing unused or expired eSIMs from your device to prevent potential conflicts or hitting device limits.
Pro-Tip for Travelers: As soon as you receive your eSIM QR code and manual activation details (like the SM-DP+ Address and Activation Code), save them or take a screenshot. This makes manual entry or requesting a replacement code much easier if needed later.
iPhone eSIM Troubleshooting: Step-by-Step Fix for “Code No Longer Valid” Error
If you’ve checked the basics and are still seeing the error, follow these steps. Start with the most common solutions:
- The Most Common Fix: Check if the eSIM is ALREADY Installed. This error often appears because the eSIM installed in the background, even if you didn’t get a clear success message.
- Go to Settings > Cellular (or Mobile Data in some regions).
- Look for your eSIM plan listed under the “SIMs” or “Cellular Data” section. It might be labeled ‘Personal’, ‘Travel’, ‘Secondary’, or similar.
- If found, tap on it.
- Ensure “Turn On This Line” is ON.
- Confirm “Data Roaming” is ON if your plan requires it, especially for international travel.
- Sometimes, you might see a visual cue like a !!!! icon at the top of your screen or next to the plan, which can indicate the eSIM is installed but needs activation or configuration.
- To be certain, you can verify the ICCID (Integrated Circuit Card ID) in Settings > General > About. Scroll down to the eSIM section. The ICCID shown should match the reference number provided by your eSIM provider below the QR code.
- If the eSIM is listed and the settings are correct (line on, roaming on if needed), it should connect automatically when you are in the supported location. No further installation steps are needed; just make sure you are in the correct country or region for the plan to become active.
- Perform Basic Device Fixes:
- Toggle Airplane Mode: Go to Control Center and turn Airplane Mode on and off.
- Restart your iPhone: This can resolve temporary software glitches or network problems. Turn off your iPhone and wait for about 30 seconds before turning it back on. Then try checking for the eSIM again or retrying the installation.
- Update Carrier Settings: Sometimes, mismatched carrier settings can cause issues.
- Go to Settings > General > About.
- Scroll down to the eSIM section. Next to “Carrier” is your carrier name and a version number. Tap the version number.
- If an update is available, you’ll see a prompt to select OK or Update. Follow the on-screen instructions. If you don’t see a prompt, your settings are already the newest.
- Ensure Correct Installation Method: Always install from the Settings menu, not directly through the Camera app. Use Settings > Cellular > Add eSIM.
- Try Manual Entry: If you’re wondering how to install eSIM on iPhone manually, this method lets you bypass QR code issues entirely.
- Go to Settings > Cellular/Mobile Service > Add eSIM.
- Tap “Use QR code”.
- Click “Enter Details Manually”.
- Enter the ‘SM-DP+ Address’ and ‘Activation Code’ provided in your email or dashboard.
- Crucial Tip: When pasting the details, do NOT include “https://” or “http://”.
- Reset Network Settings: This can refresh your network configurations and resolve underlying issues.
- Go to Settings > General > Transfer or Reset iPhone > Reset.
- Choose “Reset Network Settings”.
- IMPORTANT WARNING: This action will erase all saved Wi-Fi passwords on your iPhone. Make sure you have them backed up or noted down beforehand.
🤝 Still stuck? GOHUB’s live chat is available 24/7 to walk you through these steps in real time – whether you’re at a beach in Bali or a café in Tokyo.
Leveraging Apple’s Tools & Addressing Carrier Locks
- Use the Apple Support App (iOS 18+): If you’re on iOS 18, you can download the Apple Support app to run additional diagnostics. Open the app, tap on your iPhone, scroll down to “Cellular Service,” and tap “Run Diagnostic”. It can check for hardware and eSIM issues and guide you on next steps, including contacting your carrier or Apple Support.
- Revisit the Carrier Lock: As mentioned earlier, a carrier-locked iPhone can prevent you from adding an eSIM from a different provider. The “eSIM Cannot Be Added” error can sometimes indicate this. If your phone is locked, contact the original carrier to request an unlock code.
Already used this eSIM before? Try switching to a new eSIM plan.
When and How to Contact Support
If you’ve tried all the troubleshooting steps and the error persists, it’s time to contact your eSIM provider or carrier for further assistance.
To make the support process as smooth and fast as possible, have the following information ready:
- The specific error message you are seeing.
- Your iPhone model and iOS software version.
- Details about the eSIM plan/provider.
- Your phone number and carrier account details (password/PIN if applicable).
- Your iPhone’s IMEI or EID (found in Settings > General > About).
- A clear description of the troubleshooting steps you have already taken.
Many providers offer support via email, hotline, or live chat. Live chat is often the fastest way to get help without waiting on hold.
On a Vivo phone? Follow this eSIM activation guide for Vivo.
Preventing Future “Code No Longer Valid” Errors

Based on the causes and fixes, here are some tips to avoid this error in the future:
- Confirm device compatibility and unlock status before purchasing an eSIM for your trip.
- Always attempt installation on a stable, strong internet connection (ideally Wi-Fi).
- Deactivate any active VPNs before initiating the eSIM installation process.
- Save or screenshot your eSIM details (QR, manual codes) provided by the vendor as soon as you receive them [based on need for manual entry and potential replacement].
- Avoid scanning the QR code multiple times if the first attempt seems to fail. It’s possible it installed in the background. Check your Cellular settings first to see if the profile is already there.
Using Xiaomi 12? Check if your phone supports eSIM.
Quick Notes on Provider Variations
🔍 Not all eSIM providers are created equal – some require complicated ID verification or have hidden roaming charges. At GOHUB, our plans are 100% prepaid, with no hidden fees, no eKYC required in most regions, and easy refunds if anything doesn’t work.
While the troubleshooting steps are largely universal, how you get a replacement code or the specific activation process can vary between providers. For example, some providers like MicroEsim offer data-only plans that don’t require eKYC (Electronic Know Your Customer), simplifying the process as no identity authentication is needed. Also, the timing of activation can differ; an Airalo USA plan, for instance, activates once the eSIM connects to a supported network in the USA, even if you install it before you arrive. Always check the specific instructions from your provider.
Conclusion
Hitting the “eSIM Cannot Be Added: This code is no longer valid” error on your iPhone is certainly frustrating, especially when you’re relying on it for connectivity while traveling. However, as we’ve seen, this is a common issue, and it’s usually fixable.
Often, the simplest solution is realizing the eSIM has already installed in the background. Other key steps involve ensuring a stable internet connection, performing basic device restarts, and confirming your iPhone is unlocked and updated. If all else fails, your eSIM provider is there to help, and being prepared with your device and plan details will speed things up.
Embrace the convenience of eSIMs for your adventures! Whether you’re facing a travel eSIM not working, or a frustrating eSIM activation failed message, the steps above will help. With these troubleshooting tips in your toolkit, you’ll be well-equipped to handle this particular stumble and get back to enjoying seamless connectivity on the go.
✈️ Planning your next adventure? Explore GOHUB’s curated eSIM plans built for digital nomads, frequent flyers, and explorers who crave simplicity and savings. No roaming fees, no stress. Check our latest eSIM deals →
👉 Download the Gohub App now to get your Smart Prepaid eSIM in minutes — no lines, no stress, just instant travel data.
Using a newer iPhone? This guide covers eSIM setup for iPhone 16.